Basics
Lo Esencial
Careexpand is a web application that runs within a browser, there is no need of downloading or installing anything. Careexpand is:
Careexpand es una aplicación de web que corre dentro de su portátil de web. No hay necesidad de bajar instalar ningún programa. Careexpand es:
-
Web Based: No need of installing or configuring anything.
Basado en web: No hay necesidad de instalar o configurar nada
-
Cloud Based: No need of special computers or allocation of disk space.
Basado en la nube: No hay necesidad de computadoras especiales o asignación de espacio en su disco duro.
-
HIPAA compliant: it is fully encrypted end to end, and at rest.
Compatible con HIPPAA : Completamente encriptado de punta a punta, y en reposo.
Set up environment
Entorno de instalación
Install Chrome (free) from: https://www.google.com/chrome/browser/desktop/index.html
Instalar Chrome (gratis) de : https://www.google.com/chrome/browser/desktop/index.html
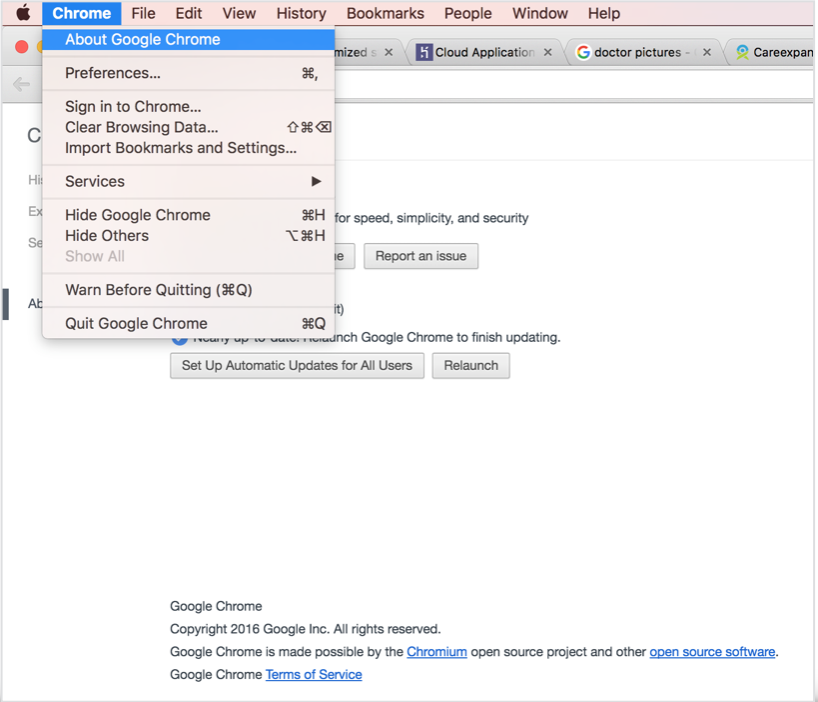
If it is already installed, check that it is updated:
Si ya está instalado, verifique que está actualizado:
- Click on Chrome (Mac) or File (Win).
- Haga clic en Chrome (Mac) o en Archivo (Win).
- Click on "About Google Chrome".
- Haga clic en "Acerca de Google Chrome".
- Update if needed, click on "Relaunch" if displayed.
- Actualizar si es necesario, haga clic en relanzar si se muestra.
Check if your account has been verified
Verifica su cuenta
You should have received a verification email from Careexpand (accounts@careexpand.com).
Deberías haber recibido un correo electrónico de verificación de Careexpand (accounts@careexpand.com)
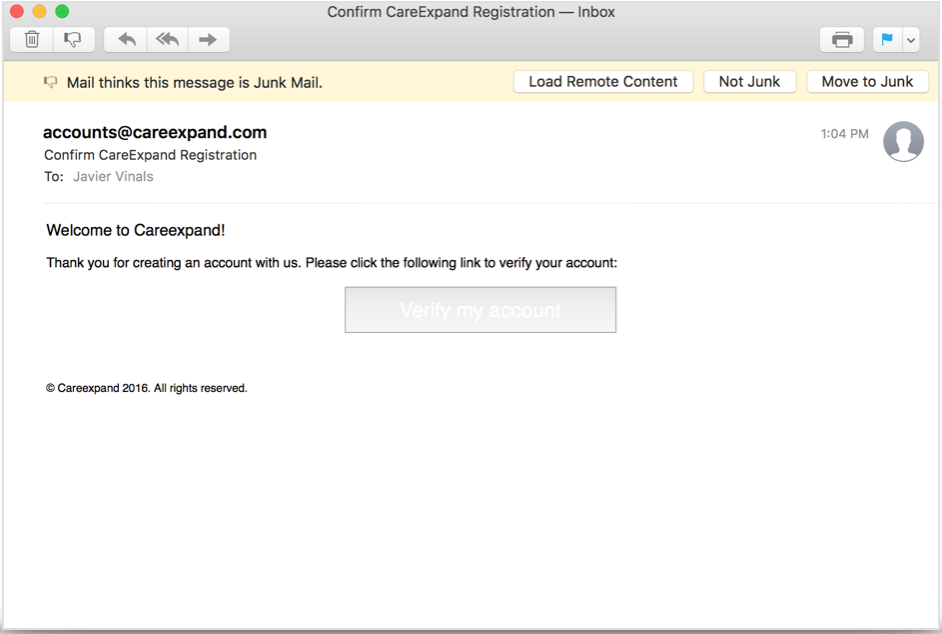
If you don’t see it, please check your "spam" or "junk" folder as sometimes email clients flag unknown senders as potentially harmful.
Si no lo ve, por favor revise su carpeta de ‘basura’ o ‘correo no deseado’. Hay veces que el cliente de email los marca como potencialmente peligroso.
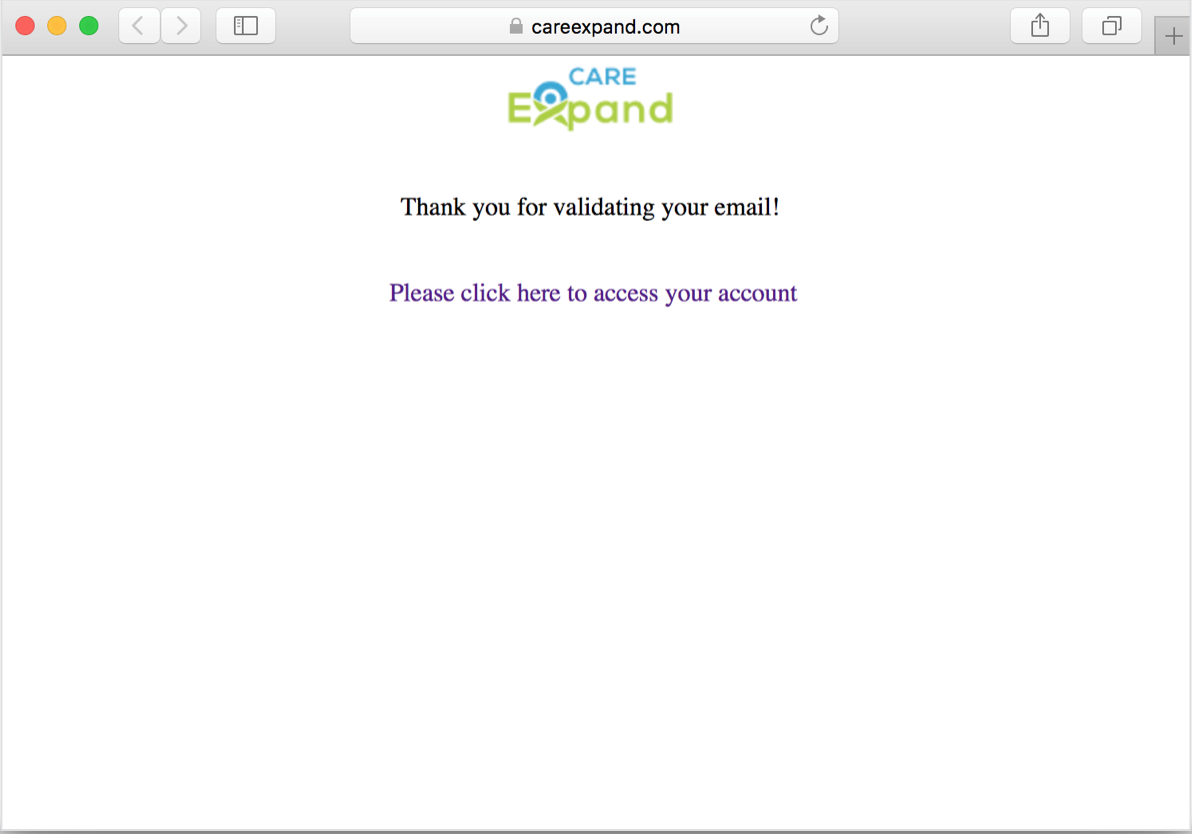
When clicking on the Verification Link on the email, it will open your default browser and show you a confirmation web page.
Al hacer clic en el link de verificación en el email, abrirá una página en su navegador de internet predeterminado y mostrarle un mensaje de confirmación.
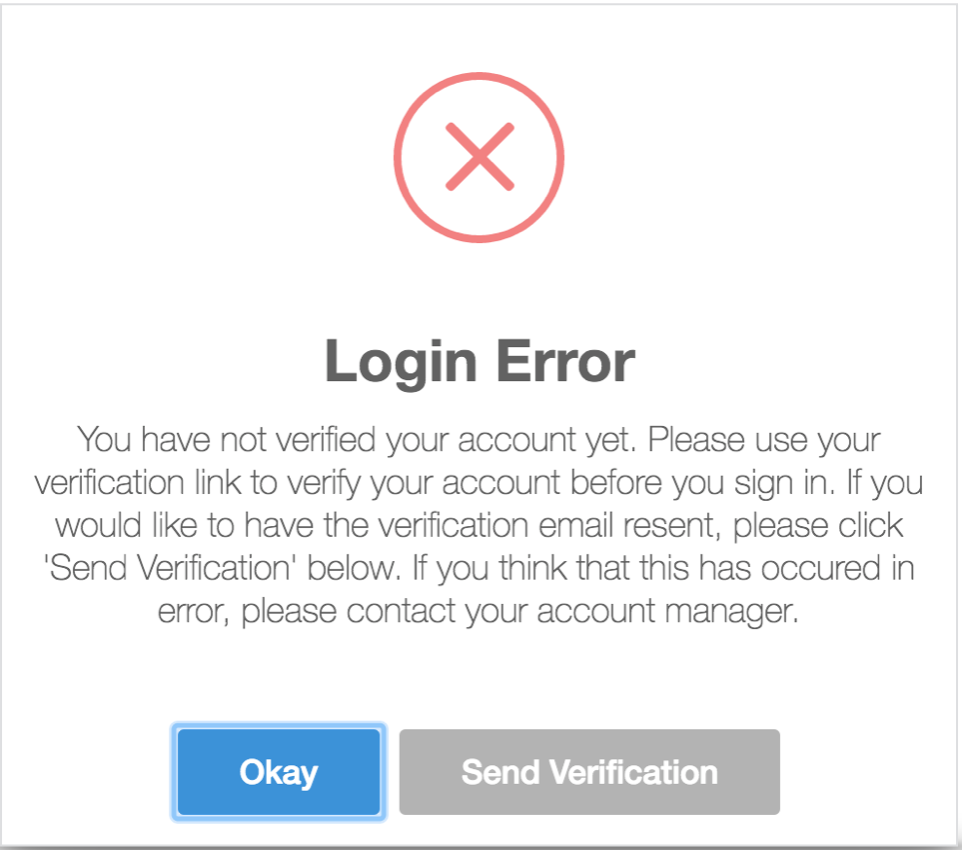
If you don’t find the Verification Email, don’t worry and just try to log in as normal. You should be prompted with a warning message and given the option to resend the Verification Link Email again.
Si no encuentra el email de verificación no se preocupe. Sencillamente haga el intento de iniciar su sesión normalmente. Un popup le enseñara una advertencia y la opción de poder mandar el mensaje de nueve.
Access Careexpand for the first time
Acceso de Careexpand por primera vez
On Chrome’s Address Bar type: https://www.careexpand.com
En su barra de direccion escriba : https://www.careexpand.com
Don’t forget the "s" at the end of http ("https" is the secure protocol of traditional "http").
No se le olvide agregar la ‘s’ al final de ‘http’ (https es el protocolo seguro de http).
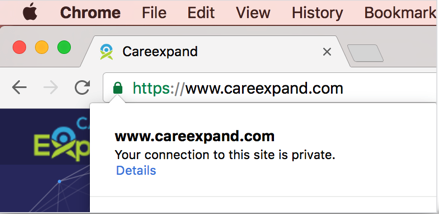
You should see a lock icon that means your connection is encrypted and private.
Verá un icono de candado que mostrara que su conexión está privada y encriptado.
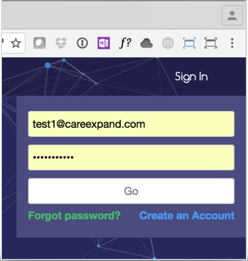
Click on "Sign In" (either at the top right or at the button in the middle of the screen). Type your email and password (as delivered by Careexpand’s representative), and click "Go".
Clic en “Sign On” (arriba a la derecha o abajo en medio de la pantalla). Escriba su email y su contrasena, (segun como se lo ha sido entregado por un representante de Careexpand) y haga clic en “Go”.
Basic navigation
Navegacion basica
Every time you log in, you will land at "My Dashboard".
Cada vez que ingrese a Careexpand se le mostrara “My Dashboard”.
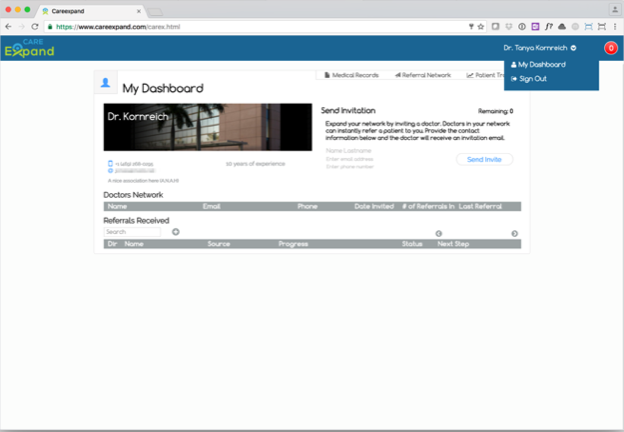
This is where you can see your profile, send invitations to other doctors for referrals and see a list of all patients that have been referred to you.
Esto es donde podrá ver su perfil, mandar invitaciones a otros doctores para derivación, y ver una lista de sus pacientes que han sido derivados a usted.
You can access this page anytime by clicking your name at the right top side of the window and selecting "My Dashboard".
Puede accesar esta página a cualquier tiempo haciendo clic en su nombre hacia arriba y la derecha y seleccionando “My Dashboard”.
Careexpand has 3 different main views (EMR, Referral Network and Patient Monitoring)
Careexpand tiene tres vistas distintas. (RME, Red de referencias, y monitoreo del paciente). Haga clic en cada uno de estos botones para cambiar de vistas.

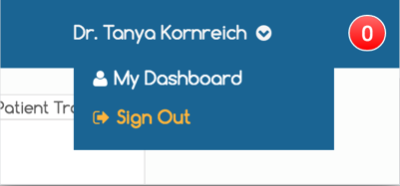
When you want to end your session, just go to the upper right menu (your name), click there to unfold the dropdown list, and click on "Sign Out ".
Cuando quiera cerrar su sesión, haga clic en su nombre, arriba y a la derecha, para ver la lista desplegable, y haga clic en “Desconectar”.
Adding a patient
Agregar un paciente
Go to the EMR view by clicking the Home Button on the top left
Primero acece la página de RME haciendo clic al icono de caza a la izquierda.
You can add a new patient by clicking the small "+" button located in the EMR Dashboard, to the right of the search box, just on top of the patients table.
Puede agregar pacientes nuevos haciendo clic en el “+” pequeño a la derecha de la barra de búsqueda y arriba de la meza de pacientes.

It will take you to a page where you can add First and Last name of the patient by clicking on the field for "Patient"s Full Name", and same thing for date of birth and gender (type "M" for Male, and "F" for Female).
Te llevará a una pagina donde podras agregar el nombre y apellido haciendo clic en el campo de texto “Name of Patient”. Lo mismo con la edad y el género del individuo (escriba “M” por masculino y “F” por femenino)

Finish by clicking "Save and Proceed". You will see how the interface shows an empty record that you can start filling up.
Termine por hacer clic en “Guardar y Proceder”. Verá que la interface le mostrará un registro vacío que podrá llenar con información.
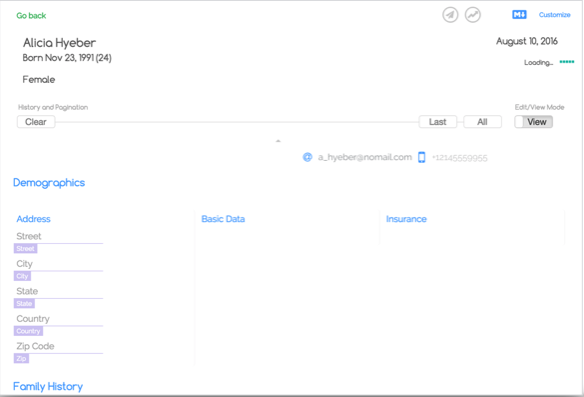
When you are done, just click "Go back" on the upper left corner. The information will save automatically be stored for later change.
Cuando haya terminado, solo haga clic en retroceder en la esquina a la izquierda. La información se guardará automáticamente para que pueda hacer cambios más adelante.
The EMR dashboard will show you the table where your newly created patient can later be updated.
El RME le mostrará la mesa donde el recién creado paciente puede ser modificado.

Editing the EMR of a patient
Editando el RME de un paciente
To access the EMR of a patient, go to the EMR Dashboard (click on Medical Records on the upper right navigation bar) and just click the name of the patient on the table.
Para acceder el RME del paciente, vaya a la vista del RME ( haciendo clic en “todo” en la barra de navegación a la derecha.) y haciendo clic en el nombre del paciente.
The medical record has multiple sections that can be viewed and edited.
El registro médico tiene múltiple secciones que pueden ser vistas y editadas.

The EMR will show all saved information to date. When clicking the button to "Add Text", the EMR will display a clean form to start adding new information for that specific section.
El RME le mostrará toda la información hasta la fecha. Cuando haciendo clic a “Add text”, el RME le mostrará una forma vacía para que se le empiece a agregar informacion a cada área específica.

To add information to the EMR, just click on any section, subsection or item and start typing. When moving your mouse over a section you will notice that a blue-dotted rectangle indicates that you can click and start adding data to that section.
Para agregar informacion al RME, haga clic a la sección, subsección o articule y empiece a escribir. Cuando mueva su mouse arriba de una sección notaras una caja punteada azul, indicando que puedes hacer clic y empezar a agregar informacion a esa área.

Timeline Navigation
Navegando la línea de tiempo
You can navigate the history of the medical record of the patient in two ways:
Puedes navegar el historial del registro médico en dos formas:
The first one is by clicking the circled numbers that represent the visits of the patients. The small circles contain the number of the visit, and when moving the mouse over them the date is displayed.
La primera es haciendo clic en los círculos con números que representan las visitas del paciente. Los círculos contienen el número de la visita, y cuando mueva su mouse sobre ellas la fecha se muestra.
By clicking on these circles you can select that visit and make the Medical Record filter data and display only information retrieved at that visit. You can also click "Last" to display only the last visit, or "All" to see all visits at once.
Haciendo clic en estos círculos puedes seleccionar la visita y hacer el registro médico filtrar la información y mostrar lo que a sido agregado esta visita. Se puede también hacer clic en “Última” para ver la última visita del paciente o “All” para ver todas las visitas a la vez.

You can also click on the grey button with a white triangle pointing down to display the full timeline of the life of the patient.
También puedes hacer clic en el botón gris con el triángulo blanco apuntando hacia abajo para visualizar la línea completa de vida del paciente.

The square boxes to the top left of the timeline are the visits (clicking on them will select that visit for display). These boxes contain the date (top), the number of elements stored for that visit (the big number to the right), and a letter "D" if the information is data or a letter "R" if it’s a dropped report.
Los cuadros a en la área superior a la izquierda de la línea de tiempo son las visitas ( haciendo clic en ellos permite visualizar esa visita). Estas cajas contienen la fecha (superior), el número de elementos guardados en la visita (el numero grande a la derecha), y una letra “D” si la información es data o una letra “R” si es un reporte subido a la base de datos.
The four small buttons to the top right allow the user to zoom the timeline: "Reset" will take the timeline to it’s original state, "Edits" will zoom to the period where the visits took place, and "+" or "-" will zoom in and out respectively.
Los cuatro botones pequeños en la área superior a la derecha permite al usuario enfocar en la línea de tiempo: “Reset” regresa la línea de tiempo al estado original, “Edits” enfoca donde la área toma lugar, y “+” o “-” acerca o aleja respectivamente.
The smaller bands with a colored dot to their left end represent the different diseases found in the Medical Record of the patient, locating them (with duration/length) in relation to the life of the patient. When moving the mouse over these bars, more information regarding the ICD code of the disease will display.
Las bandas más angostas con puntadas coloreadas a la izquierda representa las diferencias en enfermedades en el Informe médico del paciente, localizando los ( con duración/longitud) en relación a la vida del paciente. Cuando mueves el mouse sobre las barras, mas informacion con respecto a los códigos del ICD se mostrará.
Section Templates
Modelo de sección
Careexpand uses a pre-defined standard template to organize the information of the Medical Record. This template is the one that is used by default at the beginning and only contains the most basic sections and subsections (demographics, family history, personal history, etc.)
Careexpand usa modelos predefinidos para organizar el informe médico. Este modelo es el que se usa predeterminado en el principio y contiene las áreas más básicas ( datos demográficos, historial de familia, historia personal,etc.)
At any time, you can configure and use different sections, subsections and items, create new ones or import from the Template Store.
A cualquier tiempo puedes configurar y usar diferentes secciones, subsecciones y artículos, crear nuevos o importar desde la tienda de modelos.
To start interacting with the templates of sections, subsections and items, click the label that reads "Customize Template" at the top right corner of the page.
Para empezar a interactuar con los modelos de las secciones, subsecciones y artículos, clic en la etiqueta que dice “Customize Template” en la esquina a la derecha de la área.

The template toolbox allows you to visualize sections. You can click on any section, drag it and drop it onto your Medical Record area. The new configuration of your Medical Record will be saved automatically. In the same way, to delete a section, just drag it from your Medical Record and drop it in the template area.
Las herramientas de los modelos permiten que visualizes secciones. Puedes hacer clic en la sección, arrastrar y soltar las en el área de Informe Médico. La nueva configuración de su Informe Médico será guardado automáticamente. En la misma forma, para borrar la sección, arrastre y suelte del Informe Médico a la área de modelos.

You can search for any section in the Section Database by typing into the "Search Sections" input box. You can also open the dropdown menu to the top right corner to import a complete template with its sections, subsections and items. Once you do that, those sections will replace the ones that you can see in the template area. To use all these section (the full template) at once, click on the label that reads "Import All" and acknowledge the popup dialog that will show up.
Puedes buscar cualquier sección en la base de datos escribiendo en el campo de “Search Sections”. También puedes importar un modelo de secciones con subsecciones y artículos haciendo clic en “Seleccionar collecion para ver”. Ya que la lista está abierta y seleccione un modelo, esas secciones reemplazaran las áreas que ya están en él su modelo. Para usar todas las secciones (el modelo completo) a la misma vez, haga clic en la etiqueta marcada “Import All” y confirme en la ventana popup.
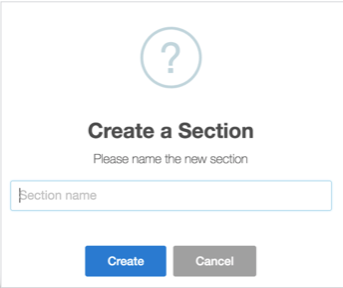
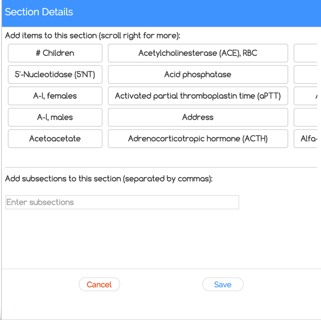
Any configuration that you worked out can be stored for further personal use by clicking on the label "Export Template". It is also possible to add custom sections by clicking "Add Custom Section". To add subsections or items, double click on a section name in the Medical Record while having the template area open.
Cualquier tipo de configuración que hayas creado puede ser guardado para uso personal haciendo clic en la etiqueta marcada “Export Template”. También es posible agregar secciones personalizadas haciendo clic en “Add Custom Section”. Para agregar un subsección o artículo, haga doble clic en el nombre de sección en el registro medio mientras tengas la area del informe médico abierto.
Adding external information
Agregando información externa
You can add almost any kind of information to Careexpand. The most common types of files (like .pdf, .png, .tif, .jpg) are admitted.
Puedes agregar casi cualquier tipo de información a Careexpand. Lo archivos más communes como (.pdf, .png, .tif, .jpg) son permitidos.
To add external reports to the system, just drag them and drop them over the area labeled as "Reports".
Para agregar reportes externos al sistema, haga clic en su archivo y arrastre y suelte en la área marcada “Informes”.
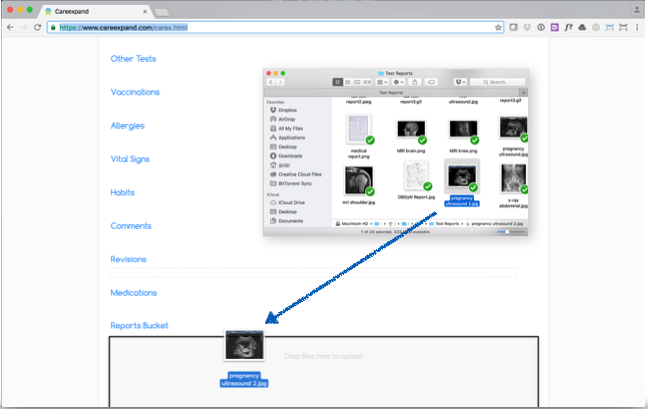
You can also add files by clicking the "Reports" area. A search window will pop up, select the file you want to upload and click "Open".
Puedes agregar archivos haciendo clic en la área marcada “Informes”. Una ventana de búsqueda se visualizará, dándole la opción de poder subir sus archivos haciendo clic en “Open”.
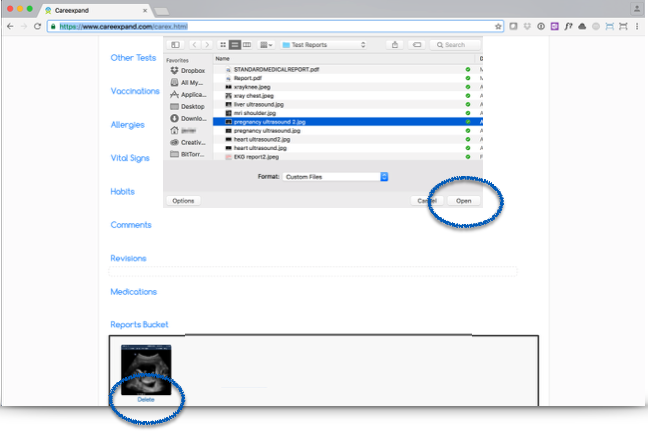
To delete a report that has already been dropped, click on the label "Delete" below the thumbnail.
Para borrar un reporte que ya ha sido añadido, haga clic en la etiqueta “Delete Report” bajo el el cuadro marcando el reporte.
Referring a patient
Refiriendo a un paciente
To refer a patient to another doctor, from the Medical Record screen, click on the small "Share" button at the top right area. A popup window will be displayed.
Para referir a un paciente a otro doctor, desde la pantalla de registro médico, haga clic en el botón pequeño marcado “Enviar” en la área superior a la derecha. Una ventana popup se mostrará.

You can select the recipient of your patient in the section labelled "Flow", field "Visit:".
Puedes seleccionar el destinatario en la sección marcada “Flujo”, el campo “Visitar”.
Type the name of the doctor or group under the field "Visit:". Another popup will display with available options. If the doctor has already used Careexpand you will see his name on the list, and you can just click on his name to select.
Puedes escribir el nombre del doctor o grupo en el campo “Visita”. Otro popup se mostrará con opciones disponible. Si el doctor ya ha usado Careexpand se mostrará el nombre en una lista, donde solamente tienes que hacer clic para seleccionar.
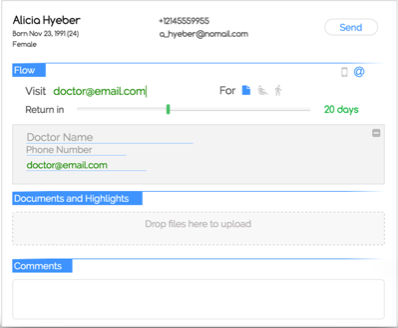
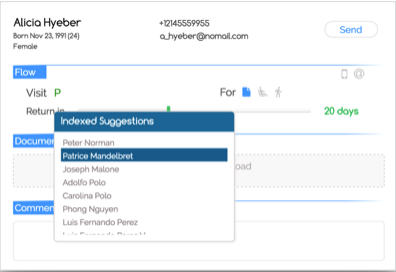
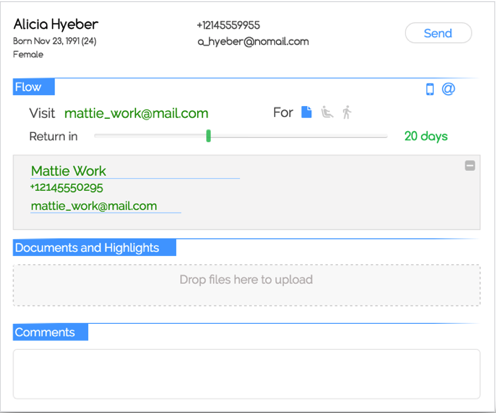
If the doctor you want to send the patient to does not appear in the list, you can still send him the patient by just typing his email into the "Visit:" area. As soon as a new email is detected, you will be prompted to add a Name and a Phone Number for that doctor.
Si el doctor que desea referir a un paciente no aparece en la lista, puedes mandar el paciente haciendo clic en el campo de “Visita” y escribiendo su nombre. Cuando el nuevo email esta detectado, se le pedirá que agregue el nombre y número telefónico del doctor.
You can also drop new reports on the "Documents and Highlights" Area (in the same it’s done on the Medical Record section), add your comments for the referral under "Comments", select a Goal with the "For" field and move the slider to select the time you want the patient to return.
Puedes también agregar nuevos reports en la area de “Informes” (en la misma area hecho en la sección de registro médico), agregue sus comentarios para su referencia bajo “Comentarios”, seleccione una meta con el campo de “Para” y mueve el deslizador para seleccionar cuándo desea que el paciente regrese de nuevo.
Visualizing your referral network
Visualizando su red de referencias
Once you have added the information, click on "Send". You will see a confirmation popup window.
Ya que hayas agregado la información, haz clic en “Enviar”. Verás una ventana popup de confirmación.
To track your patient and communicate with the doctor you referred to, go to the Referral Network Dashboard by clicking "Referred" on the top right navigation bar.
Para rastrear a sus pacientes y comunicarse con el doctor que ha referido, vaya al tablero de red de referencias haciendo clic en “Referidos” en la barra de navegación a la derecha.
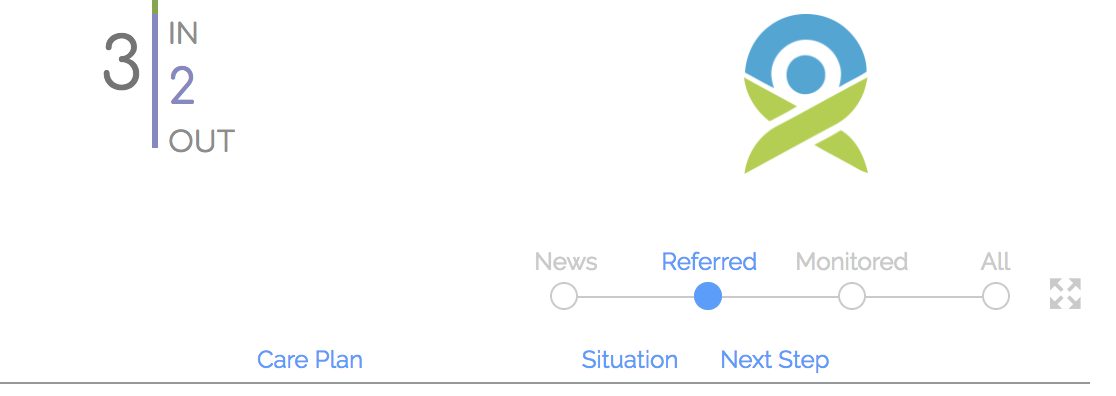
You will access the Referral Network Dashboard where you will see a table with the patients that you have sent to others or that other doctors have sent to you.
Tendrás acceso al tablero de red de referencias donde verás una mesa con los pacientes que has mandado a otros doctores o que han sido referidos a usted.

The table of patients will give you an idea on how every referred patient is performing: an arrow icon indicates if the referral is coming in (Green) or out (Blue), the Name of the Patient, the Destination Doctor, Care Plan (with start and end dates, and a small circle indicators that mark the time of the next step), the status (also color coded: On Track, Delayed or Failed) and the Next Step.
La tabla de pacientes le dará una idea de cómo cada paciente referido a usted está realizado: un icono de una flecha indica si su referencia es de venida (verde) o salida (azul), el nombre del paciente, el doctor de referencia, el plan de salud (con fechas del comienzo y fin, y un círculo pequeño indica el proximo el tiempo del próximo paso), el estatus( tambien colorido: en camino, retrasado, o fallado) y el próximo paso.

When moving the mouse over the rows, you will notice that background color shifts to grey and a turn-off icon appears to the right side. Click this button to finish the referral process for that patient.
Cuando mueves el mouse sobre las filas, notaras que el color de fondo cambia a gris y un icono de poder aparece al lado derecho. Haga clic en este botón para terminar el proceso de referencias para ese paciente.
Tracking your referral
Rastreando a sus pacientes
You can access the Referral Tracking Page by clicking on the name of the patient when in the Referral Network Dashboard.
Puedes accesar la página de referencia haciendo clic en el nombre del paciente cuando en el tablero de red de referencias.
The top contains the name of the Patient and age, the name of the Referred Doctor and time that the return of the patient is expected.
El parte superior contiene el nombre del paciente y la edad, el nombre del doctor referido y el tiempo esperado del regreso del paciente.
At the right side we can see the Referral Plan. The right side of this graph contains the different steps of the Plan. By moving the mouse over any step in the Plan, you can delete the step (trash icon), check the step as done (check mark icon), or position the step at any other day (cross arrow icon). You can also add a step by clicking the "+" sign at the top right area.
Al lado de la derecha podemos ver la area de plan de referencia. El lado de la derecha contiene los diferente pasos del plan. Moviendo su mouse sobre cualquier paso en el plan, puedes borrar el paso (icono de basura), marcar los pasos completos (icono de verificación), o reposicionar el paso al otro dia (icono de flecha cruzada). Puedes agregar un paso seleccionando el símbolo “+” en la área superior a la derecha.
When a step has been done, a green check mark will appear, with the name of the person that checked it and the date (all in green if done by other than you, and blue if done by you).
Cuando un paso a sido terminado, , una marca verde de verificación aparecerá, con el nombre del individuo que lo marcó completo y la fecha ( todo en verde si está completo por alguien más, y azul si está completado por usted).
The left side of the chart contain the "events" icons that mark every single intervention over the patient. These can be:
El lado izquierdo contiene un iconos de eventos que marcan cada intervención individual del paciente. Estos pueden ser:
 Referral Reviewed (two arrows)
 Referencia Evaluada (dos flechas)
 Medical Record Reviewed (magnifying glass)
 Registro Medico Evaluado (lupa)
 Document Uploaded (cloud with an arrow)
 Documento Cargado (nube con una flecha)
 Message Sent (speech bubble)
 Mensaje Mandado ( burbuja de mensaje)
Exchanging messages
Intercambiando mensajes
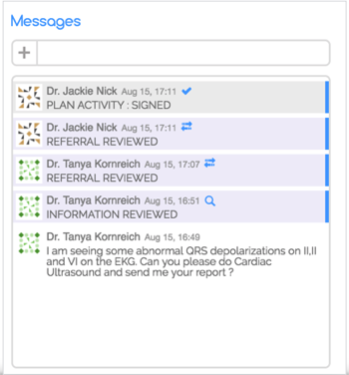
The left side there is the Messages Area. Here we can type a message to the referral by adding the content in the box below the "Messages" label and pressing enter or clicking the "+" button to the left.
La área a la izquierda podemos ver una área de mensajes. Aquí podemos escribir un mensaje a un referido simplemente escribiendo lo contenido bajo la caja marcada “Mensajes” y presionando enter o haciendo clic en el botón “+” a la izquierda.
Below this message input area, we can see an organized list of messages sent or received.
Bajo esta área de entrada de mensaje, podemos ver una lista organizada de mensajes mandados o recibidos
All messages contain a personalized avatar icon at the left side, the name of the owner of the message, the date and time, the content, and in some cases an event icon.
Todos los mensajes contienen un avatar personalizado al lado izquierdo, el nombre del propietario del mensaje , la fecha y el tiempo, el contenido, y en unos casos un icono de evento.
Messages sent by the system contain a blue bar to the right and are shadowed (clear green for activity of others, and clear blue for our own activity). These messages are coming from the system itself and describe actions taken on the Referral Plan (checked, deleted or moved steps, messages, information reviewed).
Mensajes mandados por el sistema contienen una barra azul a la derecha y están sombreados (un verde claro se refiere a los actividad de los demás, y una barra azul para la actividad propia). Estos mensajes vienen del sistema y describen acciones tomadas por el Plan de Referencia (revisados, borrados o movidos al siguiente paso, información revisada.
Sharing reports
Compartiendo Reportes
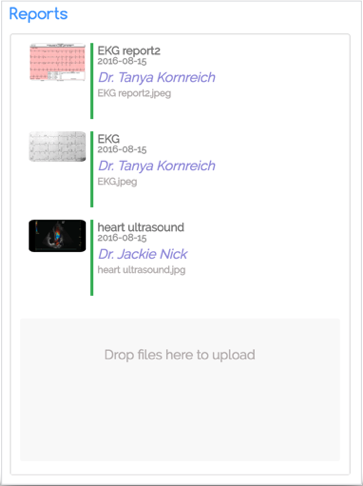
The Reports area sits below the Messages Area. Here we can see all available reports (each of the with a miniature, the type, date of creation, author and name of the file).
La área de reportes siente arriba de la área de mensajes. Aquí se pueden ver todos los reportes ( cada uno con una firma, tipo de archivo, fecha de creación, autor y nombre del archivo)
There is also a Drop Area where anybody can share new reports at any time.
También hay una área donde cualquiera puede someter reportes a cualquiera hora.
Referral notifications
Notificaciones de Referencia
Every activity registered on a Referred Patient generates a notification that is being sent to both origin Doctor and Destination Doctor.
Cada actividad registrada en la página de patiences genera una notificación que está mandada a ambos doctor de origen y doctor de destinación.
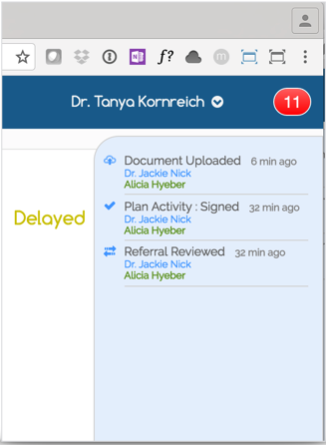
A red bubble at the top right corner of the browser window shows the number of total notifications for all patients. When clicking this button, the Notifications Queue Drawer opens up at the right side of the page.
Una burbuja roja en la esquina superior a la derecha en la ventana demuestra la cantidad de notificaciones de todos los pacientes. Cuando hace clic en este botón, el cajón de notificaciones abre del lado derecho de la página.
In this drawer you can see every single notification (icon, description, time, author and patient). You can erase the notifications by clicking on them.
En este cajón puedes ver cada notificación (icono, descripción, tiempo, author, y patiente). Puedes también borrar las notificaciones haciendo clic en ellos.
When a patient has pending unread notifications, a small red bubble with the number of unread notifications will display at the right of his name in the Referral Dashboard table.
Cuando el paciente tiene unas notificación no leídas, una burbuja roja con el número de notificaciones no leídas será visualizado a la derecha del nombre en el tablero de Referencias.

When the other doctor performs an action at the time you are working with the system, a real-time notification will display immediately at the right top side of your browser, and the red bible will blink for a few seconds.
Cuando otros doctores hagan esta acción a la misma vez que usted está viendo el sistema, una notificación se visualiza al tiempo real a la derecha en su ventana y una burbuja roja parpadea por unos segundos.

Remote monitoring a patient
Monitoreo remoto
To start monitoring a patient, from the Medical Record screen, click on the small "chart" icon at the top right area. A popup window will be displayed.
Para comenzar el monitoreo del paciente, haga clic en el icono del gráfico en la área a la derecha. Una ventana se abrera.

Move the main green slider under "Protocol" section to the desired length of the protocol, and click "Send" to kickstart the monitoring process.
Mueve el control deslizante bajo la área “Protocol” para marcar la longitud deseada del protocolo. Haga clic en “Enviar” para comenzar el proceso del monitoreo.
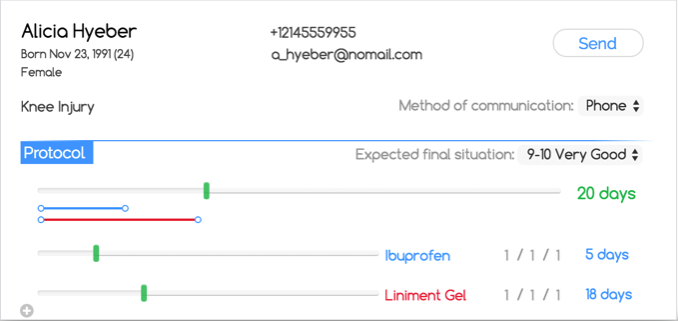
Optionally, you can set a specific "Reason for Monitoring”"by typing on that field, and edit the fields "Method of communication" (Phone, Text or Email), "Expected final situation" (from 1 to 9), and add medication by typing into "Medication" field to the left of the smaller slider below the main one (you can add more medications by clicking the "+" button at the bottom left corner, and modify the pattern of every medication by editing the numbers between slashes to the right).
Opcionalmente puedes marcar una “razón específica” para el monitoreo del paciente por escribiendo eso en el campo y editando el campo “Método de comunicación” (teléfono, texto, o email) y resultado final esperado (de 1 a 9), y agregue un medicamento escribiendo en el campo “Medicamento”, a la izquierda en el deslizador pequeño debajo del deslizador principal ( se puede agregar más medicamentos haciendo clic en el símbolo “+” en el rincón de la izquierda, y modificar el patrón de cada medicamento por editando los números dentro de las barras a la derecha).
Once you have added the information, click on "Send". You will see a confirmation popup window.
Ya que hayas añadido la información, haz clic en “Enviar”. Un pop up abrirá una ventana confirmando su envío.
Visualizing health status
Visualizando el estatus de salud
To monitor the health status of your patient, go to the Patient Tracking Dashboard by clicking "Monitor" on the top right navigation bar.
Para monitorear el estatus de salud del paciente, haga clic en la tablero del monitor de pacientes en la barra de navegación a la derecha.

You will access the Patient Tracking Dashboard where you will see a table with the patients that you are already monitoring.
Vas a acceder al tablero del seguimiento del paciente donde verás una mesa con los pacientes que ya están monitoreados.

The table displays the patients Age, Patient, Feedback, the Monitor timeline, a star symbolizing Compliance, Therapeutic Adherence, and the latest Data
El cuadro demuestra la edad, el paciente, realimentación, la línea de tiempo del monitoreo, una estrella simbolizando al seguimiento, adherencia terapéutica, y lo ultimo de información añadida.
When moving the mouse over the rows, you will notice that background color shifts to light blue and two icons appear to the right side, a Pause icon and a Turn-off icon. Click the Turn-off button to finish the monitoring protocol (it will be archived and will be visible on the Medical Record of the patient), and click the Pause icon to put monitoring on hold. When the patient protocol is paused, a "Play" icon will display instead (you can click this button to restart the protocol again).
Cuando el mouse es movido sobre las filas, notaras que el fondo cambia color a un azul claro y dos iconos aparecen al lado derecho, un icono de Pausa y un icono de Apagar. Clic en el icono de apagar para terminar el protocolo del monitoreo ( esto será archivado y será visible en el registro de información médico del paciente). El clic en el icono de Pausa para poner el monitor en pausa. Cuando el protocolo está pausado, un icono de Resumen esta mostrado en lugar ( puedes hacer clic en este botón para restaurar el protocolo otra vez.
Analyzing health status
Analizando el estatus de salud
You can access detailed information of the Tracking Protocol by clicking on the name of the patient when in the Patient Monitor Dashboard. This action will display a popup window with the full Health Evolution chart of your patient.
Puedes acceder a la información en detalle del protocolo de seguimiento haciendo click en el nombre del paciente cuando en la página de monitoreo de patience. Esto abrirá un popup con la información completa de la Evolución de Salud.
Double clicking the vertical bar chart will open up the Health Evolution chart.
Haciendo doble clic en el gráfico de la barra vertical abrirá el cuadro de Evolucion de Salud.
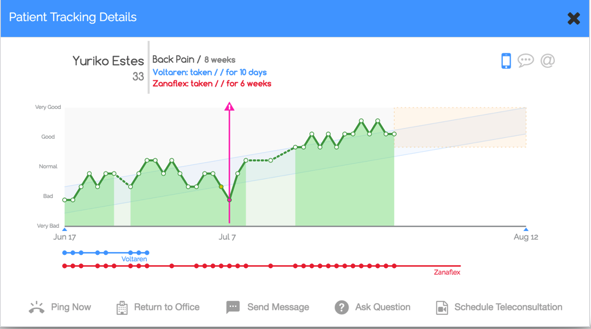
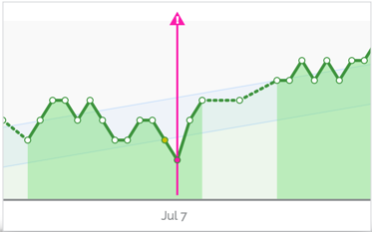
The chart contains the standard Health Status values in the vertical axis (left) while the time axis is displayed horizontally. You will notice that the line connecting dots is dotted instead of solid when there is missing information for those days (the area down the line will also display a lighter green color).
El cuadro contiene los valores de estatus de salud estándar en el eje vertical (izquierda) mientras el eje del tiempo corre horizontal. Notarás que las líneas conectando los puntos esta puntada en lugar de estar sólida cuando hay información perdida por esos días ( la área bajo esa línea también presentará un color verde más claro).
A blue band across the chart indicates the expected evolution path for this patient, and a dotted rectangle with yellow background (to the right side) indicates the expected "landing area".
Una banda azul en el cuadro indica que la evolución esperada del paciente, y un rectángulo punteado con un fondo amarillo (al lado de la derecha) indica la área esperada.
When the protocol deviates from the expected path (below the blue band) for more than 2 days, an alert will be triggered and a vertical pink line with an alert icon on top will mark the spot (a notification will also be sent to you, displaying a red balloon to the right side of the name of the patient in the patient table of the Patient Tracking Dashboard).
Cuando el protocolo se desvía del resultado esperado ( inferior a la línea azul) por más de 2 dias, un alerta será activado y una línea vertical rosada con un icono de alerta encima marcará el lugar ( la notificación también será mandado a usted, creando un globo rojo a la derecha del nombre del paciente en el tablero de pacientes).
You can also track the compliance of the patient with medication by looking at the colored lines with small dots. Every dot means that a positive message from the patient has been received on that day (the patient confirms that he has taken his medication that day).
Tambien puedes rastrear el complimiento del patiente con medicación viendo las líneas coloradas con pequenos puntos. Cada punto significa un mensaje positivo del paciente a sido recibido ( el patiente confirma que a tomado su medicina ese dia).

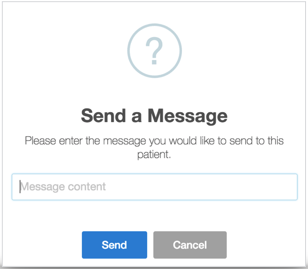
The menu on the bottom area of the popup window allow you to take different actions. "Ping Now" forces the system to request the feedback from the patient immediately (and updates the chart in real time if it gets an answer), "Return to Office" sends a message to the patient requesting him to re-schedule and visit our office, "Send Message" will display a new popup so that you can write your own message to be sent immediately to the patient, while "Ask Question" and "Schedule Teleconsultation" are not configured yet (will feature functionality soon).
El menú localizado en la parte inferior de la ventana del popup dará permisos para tomar diferentes acciones. “Ping Now”; esfuerza al sistema recibir un tipo de realimentación del paciente inmediatamente (y actualiza la tabla en tiempo real si se recibe una respuesta). “Return to Office” : manda un mensaje al paciente pidiéndole que reprograme su cita y visite a la oficina. “Send Message”: abre una ventana nueva para que escribas un mensaje a su paciente. “Ask Question” y “Schedule Teleconsultation” no estan configurados todavia pero functionalidad sera disponible pronto.

Doing Tele-consultation
Haciendo teleconsultas
The Tele-Consultation system is embedded into the Referral Tracking Page, as it is conceived exclusively as a doctor (or health professional) mediated tele-medicine process.
El sistema de teleconsultas está localizado en la página de Referencias, como es calificado como una herramienta exclusiva al doctor (o profesional de salud) o un proceso telemedicina mediado.
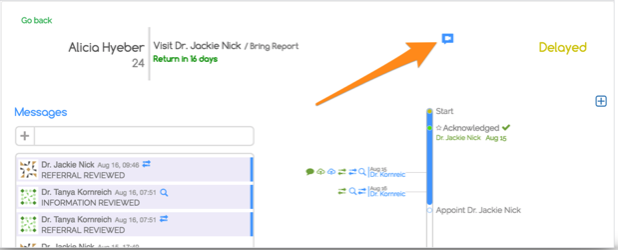
When tele-consultation is possible (the other doctor is also connected to the system at that time), a blue "Camera" icon will display in the upper area of the Referral Tracking Page. Click this icon to start the tele-consultation session (the other user will be prompted to accept the incoming video session).
Cuando es posible hacer teleconsulta (el otro doctor está conectado a la misma vez), un icono con una cámara azul se mostrará en la esquina de la página de referencia. Haga clic en este icono para comenzar su sesión de teleconsulta. (el otro usuario estará incitado a tomar la llamada de video).
If the other user accepts the call, the page will stretch to make room for the video window and the session will start.
Si el otro usuario acepta la llamada, la pagina se estirara para hacer espacio para la ventana de video y la sesión comenzará.
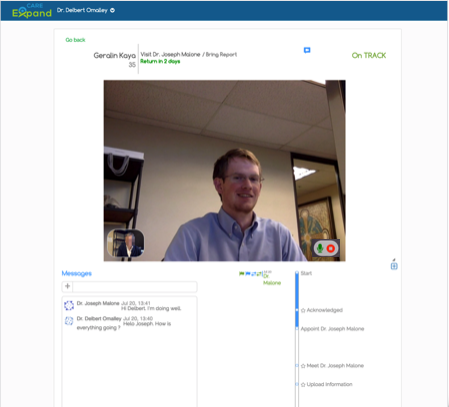
You will see the remote user in the main video window while there will be a smaller window of your own camera located at the bottom right angle. When moving the mouse over the video window, a couple of buttons will display at the bottom right corner: click the "Microphone" button to mute your microphone, and the "Stopp" button to end the tele-consultation session.
Verás el usuario remoto en la ventana principal y también se verá una ventana más pequeña con tu cámara propia. Cuando mueves el mouse sobre la ventana de video , dos botones se mostrarán en la esquina a la derecha: clic el Micrófono para hacer lo mudo , y el botón de paro para terminar la teleconsulta.
It is important to note that, in order for the browser to be able to establish the video link, the user has to specifically agree to share his video and microphone over the web. This is a security mechanism that protects you from unintended access to your media and grants you better privacy.
Es importante notar, que en orden para que el navegador establezca el enlace a su video, el usuario tiene que específicamente acceder para compartir el video y micrófono desde el web. Este es un mecanismo de seguridad que protege al usuario de acceso no intencionado a su media y garantiza mejor seguridad.
Every time that a video link is attempted, your browser will ask you for permission. You have to grant access to both your camera and your microphone in order to establish a tele-consultation session.
Cada vez que la enlace a su vídeo está interrumpida, su navegador le preguntará por permiso. Tienes que darle permisos a ambos camara y microfono en orden de establecer la session de teleconsulta.

If you haven’t closed your browser window since the last time you used Careexpand, it is possible that the permission to share the camera and the microphone has already been granted or denied and you won’t see a popup message from the browser asking for it.
Si no has cerrado tu ventana del navegador desde la última vez que haz abierto Careexpand, es posible que los permisos para compartir tu camara y microfono ya han estado concedidos o denegados y no verás un mensaje popup de su browser pidiendolos.
You can always check the status of that permission by looking at the address bar of your browser window. If the permission is granted it will display a clean camera icon, and if denied it will display a camera with an "x". You can revoke or re-grant the permission anytime by clicking the camera icon.
Puedes revisar el estatus de tus permisos viendo la barra de navegación en tu ventana. Si los permisos están concedidos un icono de una cámara transparente será visualizado. Si los permisos no están permitidos mostrará una cámara con una equis roja. Puedes retirar o acceder los permisos a cualquier tiempo haciendo clic en la cámara

It is important to note that only Chrome browser is certified by Careexpand. Some other browsers will allow full functionality including tele-consultation (including Firefox, Opera, Edge and some newer version of Internet Explorer) but Careexpand doesn’t guarantee a flawless operation with these.
Es importante notar que Chrome es el único navegador certificado por Careexpand. Otros navegadores le permitirán funcionalidad completa incluyendo ‘teleconsulta’ (incluyendo FireFox, Opera, Edge y unas versiones nuevas de Internet Explorer) pero Careexpand no garantiza la operación impeccable on estos.